


Google has probably hit the proverbial jackpot in terms of mobile photography with its Google Camera app that uses its proprietary HDR+ algorithm to produce stunning images. It’s no wonder a lot of people want the app, even if Google designed it to be used officially only for the original Pixel and Pixel 2 smartphones. Well, the Android developer community always seems to find a way, and what we have now is a surplus of Google Camera ports that can be used on non-Pixel devices.
Would it be that even the lowly Redmi Note 4 – one of Xiaomi’s 2017 midrange champions – could dream of handling such lofty software as the Google Camera with HDR+? Apparently because of the Qualcomm Snapdragon pedigree of the Redmi Note 4 – it has a variant that uses the Snapdragon 625 chipset – this is now actually possible. Aftermarket developers have worked to tweak the original Google Camera to a point that there are now ports that can be used on devices that run not just the top tier Snapdragon 800 series of chipsets, but even the midrange Snapdragon 600 ones.
So here we are, and this writer owns one Redmi Note 4 unit powered by the aforementioned SD625 chipset. The phone is really a great phone in all respects – it will do most of what you require from it on a day-to-day basis. It will even play most high graphics games without you suffering from lag. For the price of the phone – around USD$190 for the top 4GB RAM/64GB internal storage model – you get great so much value for money that getting one is almost a no brainer.
Of course, Xiaomi had to skimp on some areas to keep the price low, and you won’t see the trendy dual camera setup on the Redmi Note 4. Instead you get a 13MP main camera with phase detection auto focus (PDAF) and f/2.0 aperture lens, and a 5MP selfie shooter. If you’re lucky, your model will come with a Sony IMX258 sensor instead of a Samsung or Omnivision one – Xiaomi seems to use these three brands.
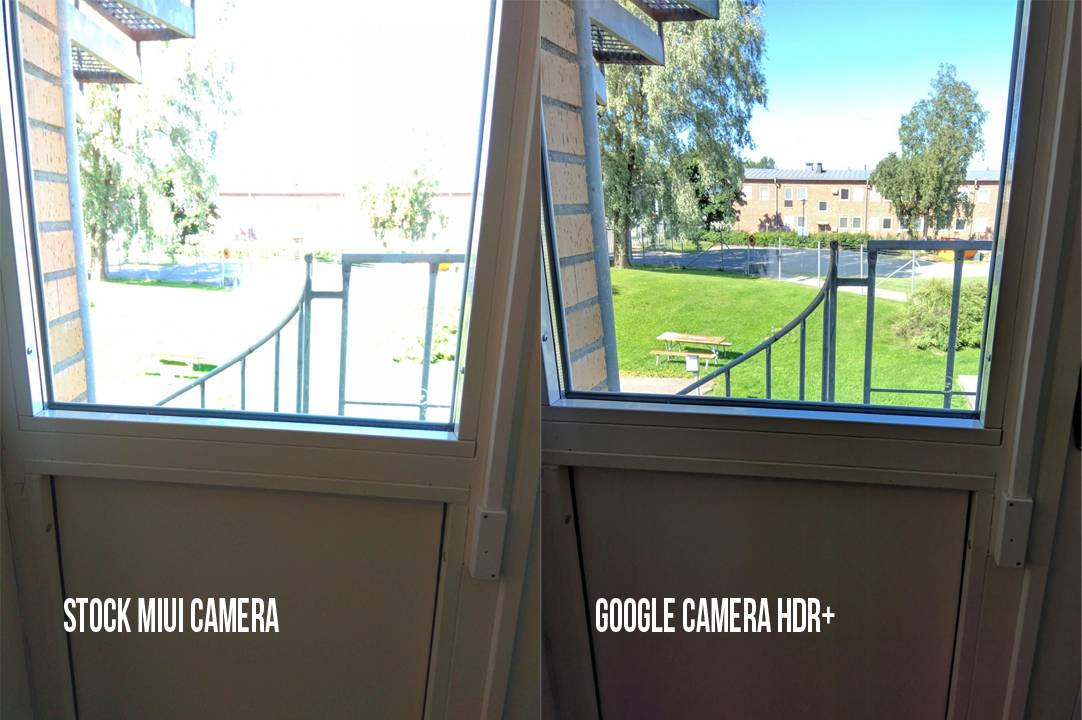
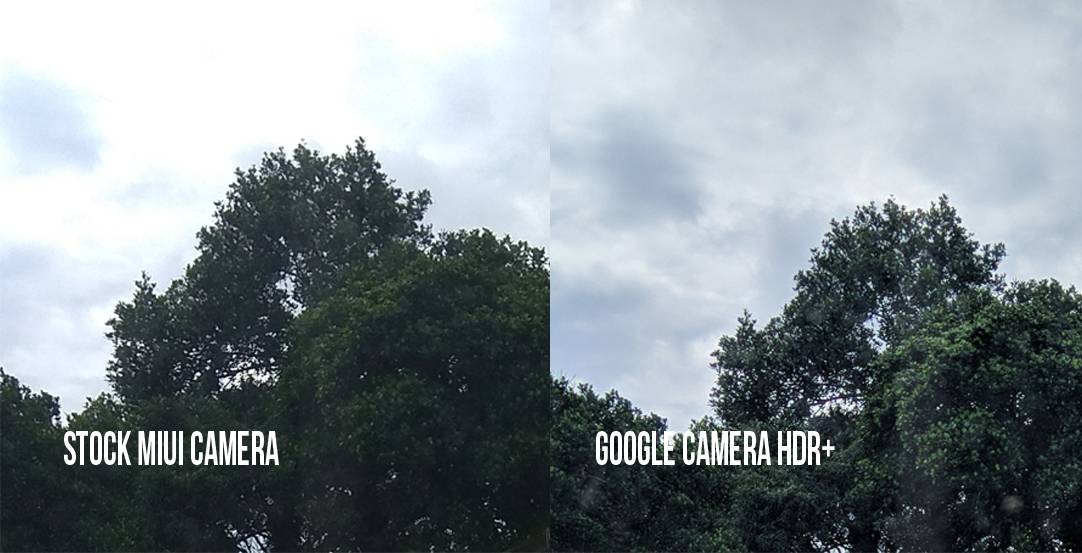
Camera performance for the Redmi Note 4 is sufficient at best, and nothing to write home about. Images taken in really bright sunlight suffer over-brightness, and lowlight images really aren’t that great. This is why developers and users were correct in thinking that the HDR+ algorithm on the Google Camera would help improve image quality by leaps and bounds.
With that, I risked rooting my Redmi Note 4, just to be able to install Google Camera with HDR+. At this point in my life, there are only a few compelling reasons to root my phone. A great camera app with proprietary algorithms that promise to improve your camera’s performance is certainly one of those.
Requirements:
1. Redmi Note 4 with Snapdragon 625 chipset, codename “mido”. We do not recommend you do this on a MediaTek powered variant.
2. Bootloader unlock on the Redmi Note 4. You will have to officially request permission to unlock from Xiaomi. This takes anywhere from 2 to 3 days. After that, the unlock procedure is pretty straightforward.
3. Gain root access to your Redmi Note 4. This will require the most work in the process, and we need to WARN you that a mistake here, or a wrong file used could end up bricking your device. As always, root at your own risk.
4. Download the Google Camera APK installer.
5. Root Explorer or ES File Explorer. Actually, any file manager app that has root explorer features.
Notes about unlocking the bootloader and gaining root access
1. The unlocking process requires that you sign up for a Mi Account, and request official unlock permission. Start that process via the official website.
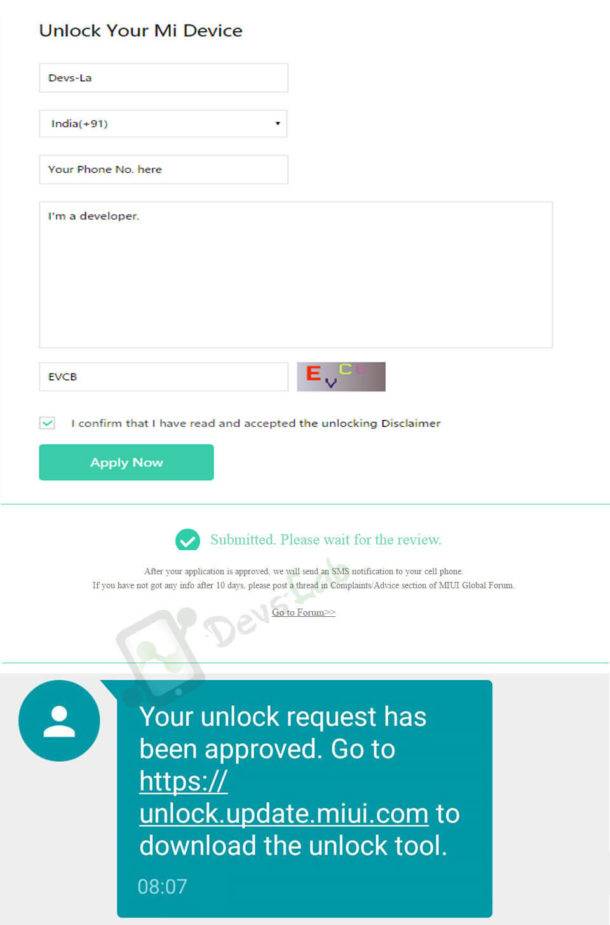
2. Once permission is given, you will have to download the Mi Unlock tool and do the unlocking yourself.
3. The best method of rooting is still flashing the TWRP custom recovery over ADB fastboot, before flashing the SuperSU file via TWRP. There are good guides to help you in this process.
4. Once unlocked and rooted, you can now install the Google Camera app.
Installing Google Camera on your Redmi Note 4
1. Make sure that you have root access; this process cannot proceed without it. Also make sure you have a root explorer file manager installed.
2. Copy the Google Camera APK onto your phone’s internal storage.
3. Enable Google’s Camera2 API.
This is not enabled by default on the Redmi Note 4, since it doesn’t have Android Oreo yet. But you can enable it. That said, enabling it will require root access and some work.
– First, use your file manager/root explorer to get to the “System” folder. Look for the “build.prop” file.
– Tap on the “build.prop” and use either ES File Explorer’s text editor, or any text editor to edit the file.
– Add this line to the file: persist.camera.HAL3.enabled=1
– Save the “build.prop” file and restart the phone.
4. Install the Google Camera APK. You may need to enable installations from unknown sources via the Settings menu.
5. Run the camera app, enter the settings menu and input these settings EXACTLY. Remember, you are mimicking settings on a Pixel phone, so these need to be exact so that the camera will work for the Redmi Note 4.
Model = Pixel 2XL
Config Camera HDR+ = Pixel 2017 Zsl Hdr+
HDR+ parameters = Super High
Final Jpg quality HDR+ = 100%
Compress Raw (*.DNG) = On
6. Upon inputting these settings, you’re ready to go. Take note that the HDR+ setting at the top of the camera viewfinder can now be set to “on”. It is on “auto” by default.
Enjoy!


