If you’ve ever rooted or tweaked your Android device for the first time, then you’ll know what we’re talking about. You download all the stuff you need and are heck excited to flash them onto your device, but you find out you still lack one thing – the Android Debug Bridge, or ADB to those who hate it. You will usually need ADB for a number of things, mostly for processes that involve connecting your Android device to your PC. Here’s how to install it without the hassle.
What is ADB?
Yeah, back up a bit. We need to tell you what ADB is and what it is used for. The Android Debug Bridge is a command-line utility included with Google’s Android SDK. With ADB, users can control their connected Android device over USB from a computer, copy files back and forth, install and uninstall apps, flash system elements, run shell commands, and more.
ADB is used for a number of geeky tricks for your Android which include flashing a stock ROM or update, flashing a custom recovery, gaining root access to your device, and other such things.
Installing ADB the proper, old fashioned way usually requires downloading the whole Android SDK. These days, that would mean a 600+ MB download of Android Studio which includes SDK Tools, which in turn includes ADB. In the past, there was no getting around this, so you had to download the whole caboodle. That presented a problem where if you had a slow internet connection, you would have to wait a while.
These days, Android has finally given us a way to get ADB – the tool we most likely will need – in a smaller download so we can just use that, instead of downloading the whole Android Studio. So here we go.
Step 1: Download the SDK Platform Tools
This is found in the official download page for SDK Platform Tools. This download includes tools that interface with the Android platform, such as ADB, fastboot, and systrace. There is a choice to make depending on the platform you use – Windows, Mac, or Linux.
Once downloaded, extract the archive to a folder on your desktop or laptop.
Step 2: Enable USB Debugging on your Android device
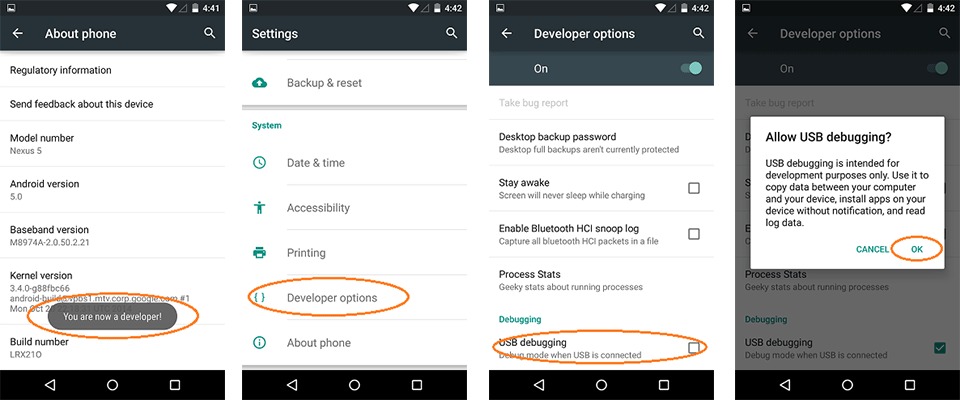
This will usually entail a few steps. First, navigate to your phone’s Settings menu, then select “About Phone”. This will show you a number of things, but we’re interested in the information for “Build Number”. Now, with your most secret agent face on, tap the build number seven times to enable “Developer Options”. Yes, it always feels like a secret agent thing every time.

Navigate back to Settings and you can now find the Developer Options menu available. Tap into that menu item and toggle/enable the setting for “USB Debugging”.
Step 3: Test if ADB is working, install device drivers if needed
For modern devices, they don’t usually need specific drivers to be detected by your desktop or laptop, Windows 10-powered laptops especially. But for older devices, you might need to do so. So we test the connection to make sure ADB is working fine. First, connect your device to the PC with the official USB cable that came with your device (some generic cables might not work).
Second, on the folder where you saved the Platform Tools, right click and select “Open Command Window Here”. Then type the command adb devices. If ADB is working correctly, you should see an entry for your device. If your device is not detected, you might need to install official device drivers so that the ADB connection can work.


